Please configure
Set up Spark Smart Mesh 2
Learn how to set up your Spark Smart Mesh 2 to expand the WiFi coverage in your house or office.
Looking for how to set up the original Spark Smart Mesh instead? Set up Spark Smart Mesh
Check what type of modem you have.
The setup instructions are different depending on what type of modem you have. Select the type of modem you have to go to the instructions for your modem.
- Spark Smart Modem 3
- Spark Smart Modem 2
- Spark 5G Smart Modem
- Spark Smart Modem
- Huawei B618s
- Huawei HG659b
- Any non-Spark modem

1. Pair your Smart Mesh 2 with your modem.
You can pair your Smart Mesh 2 either by using an ethernet cable or by pushing the WiFi Protected Setup (WPS) button.
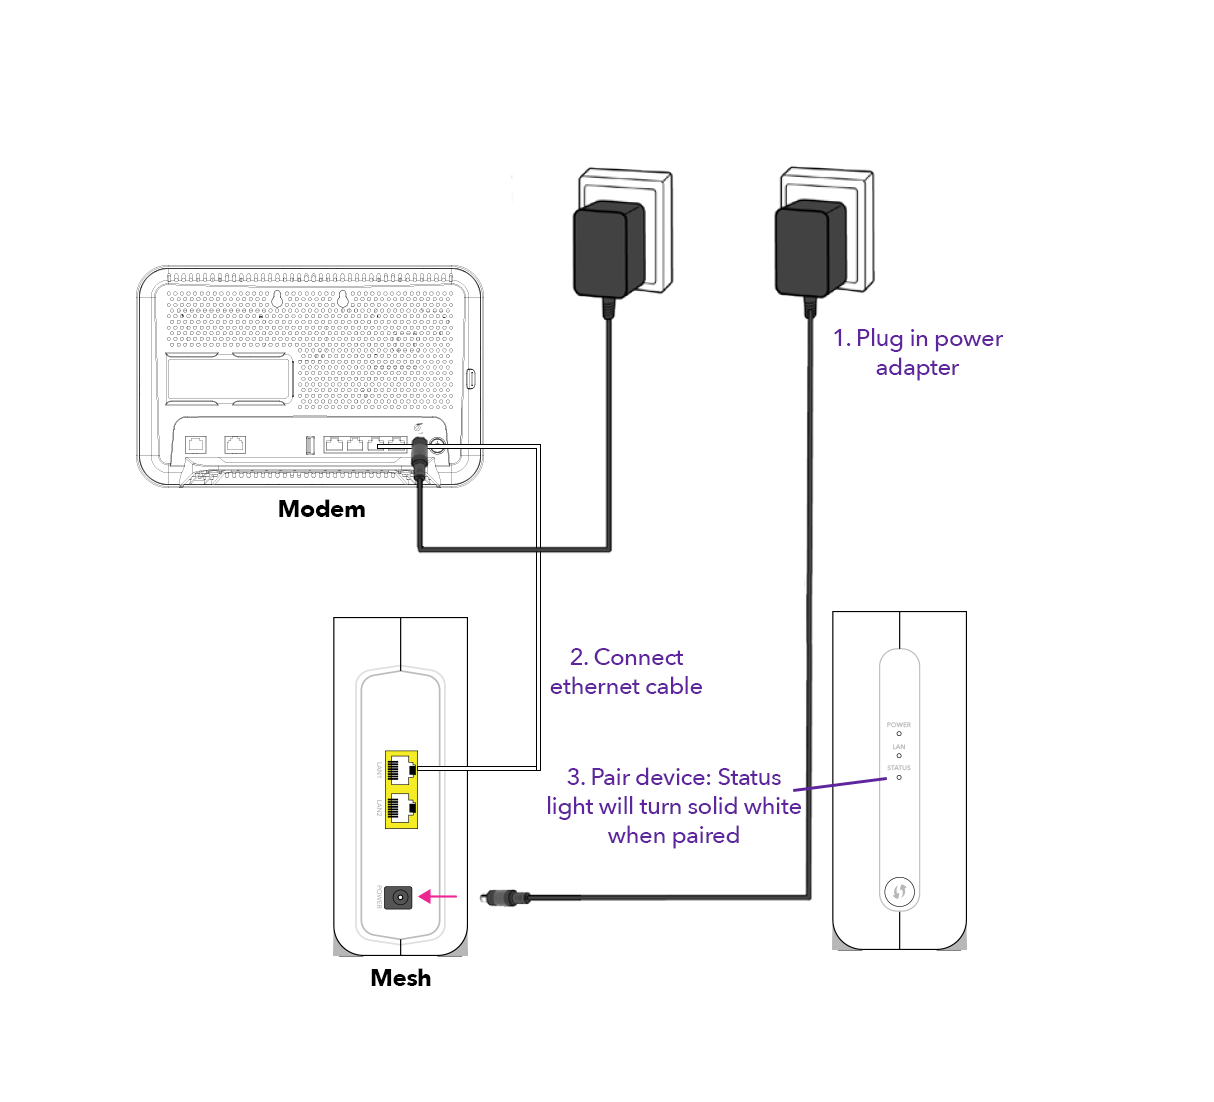
Pair using an ethernet cable
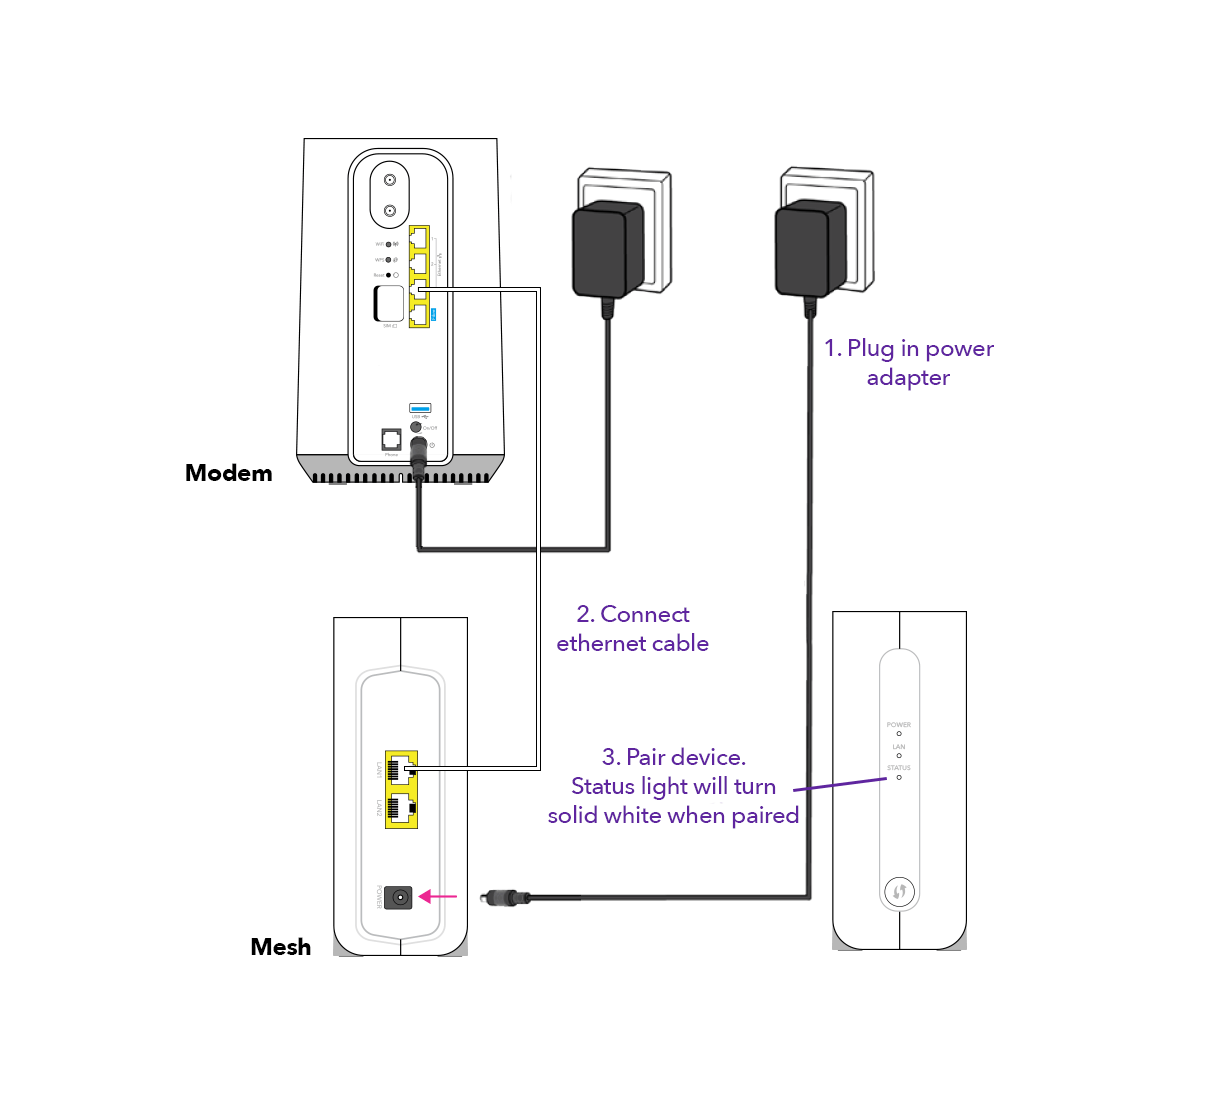
- Plug your Smart Mesh 2 into a power socket close to your modem.
- Plug one end of the included ethernet cable into an ethernet port on your modem. Plug the other end into your Smart Mesh 2.
- Wait for the status light on your Smart Mesh 2 to turn solid white. This may take up to two minutes.
- Once the status light has turned solid white, unplug your Smart Mesh 2.
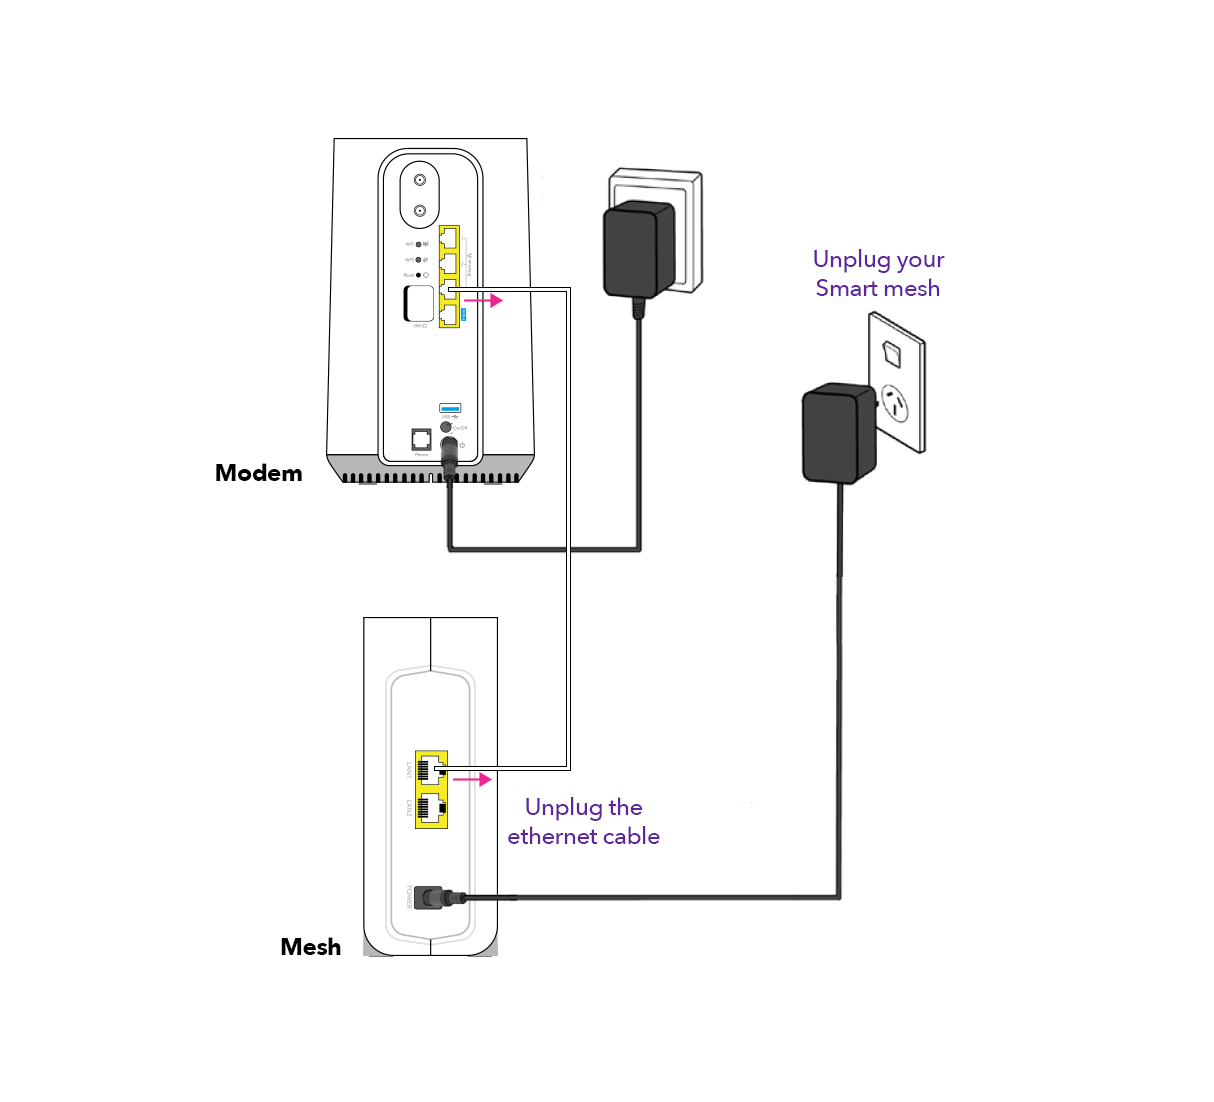
- Take your Smart Mesh 2 to the area you want to improve your WiFi coverage and plug it into a power socket there.
Some tips for where to place your Smart Mesh 2:
- Keep it away from large metal objects.
- It works best when elevated rather than near the floor.
- Check it's not obstructed by objects in front of it.
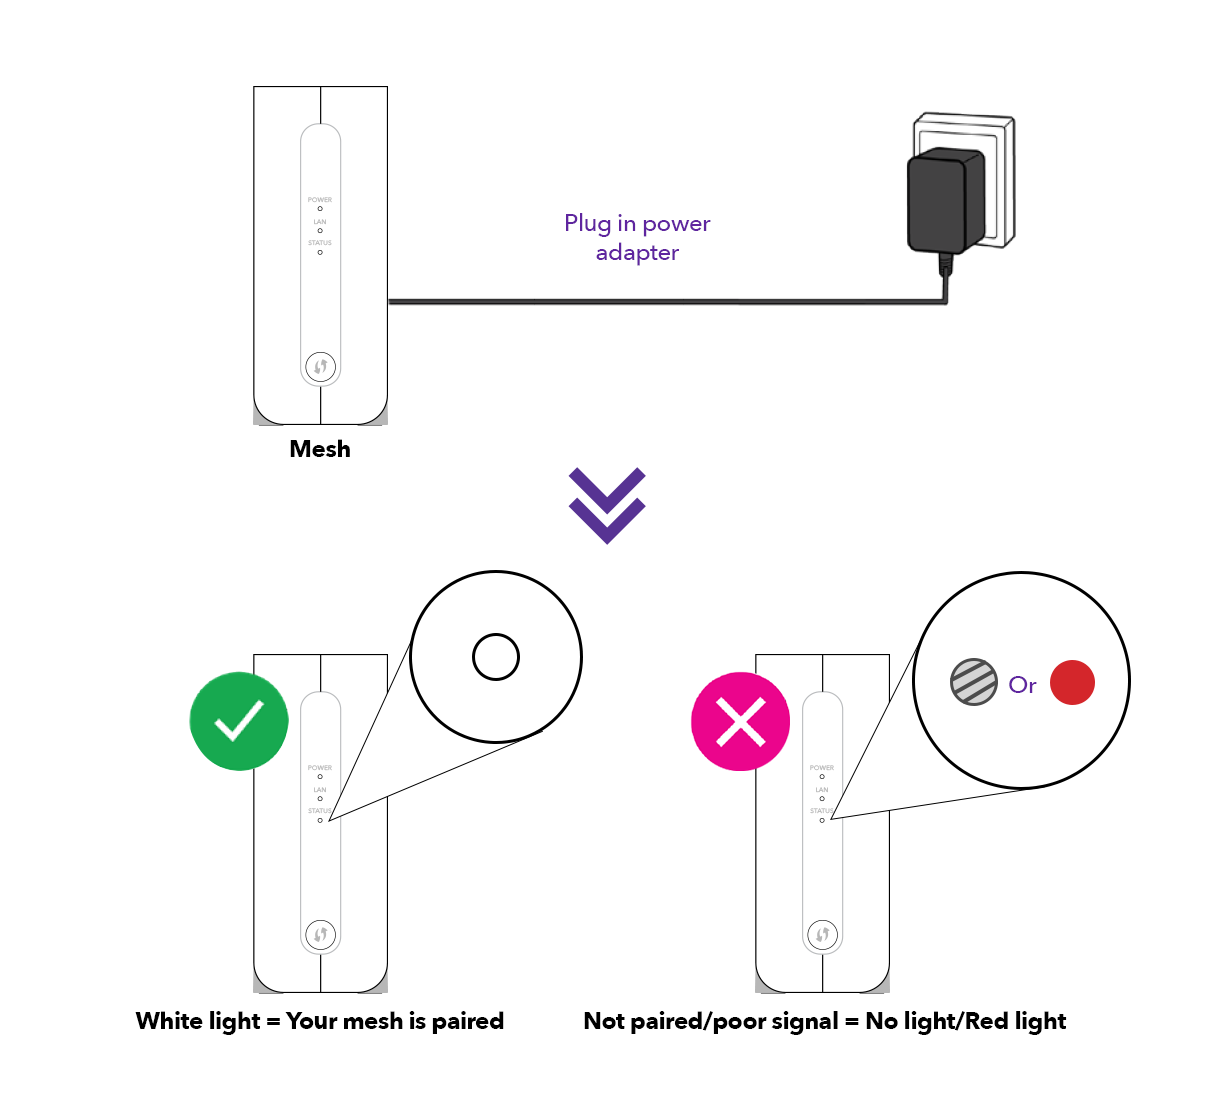
- Wait two minutes, then check the colour of the status light on your Smart Mesh 2. If it's:
- White: Your Smart Mesh 2 is receiving a reliable WiFi signal and you're all set up.
- Red: Your Smart Mesh 2 isn't getting a good signal. Move it closer to your modem or another Smart Mesh 2 if you've already set one up.
- No light: Your Smart Mesh 2 isn't receiving a WiFi signal at all. Move it closer to your modem or another Smart Mesh 2 if you've already set one up.
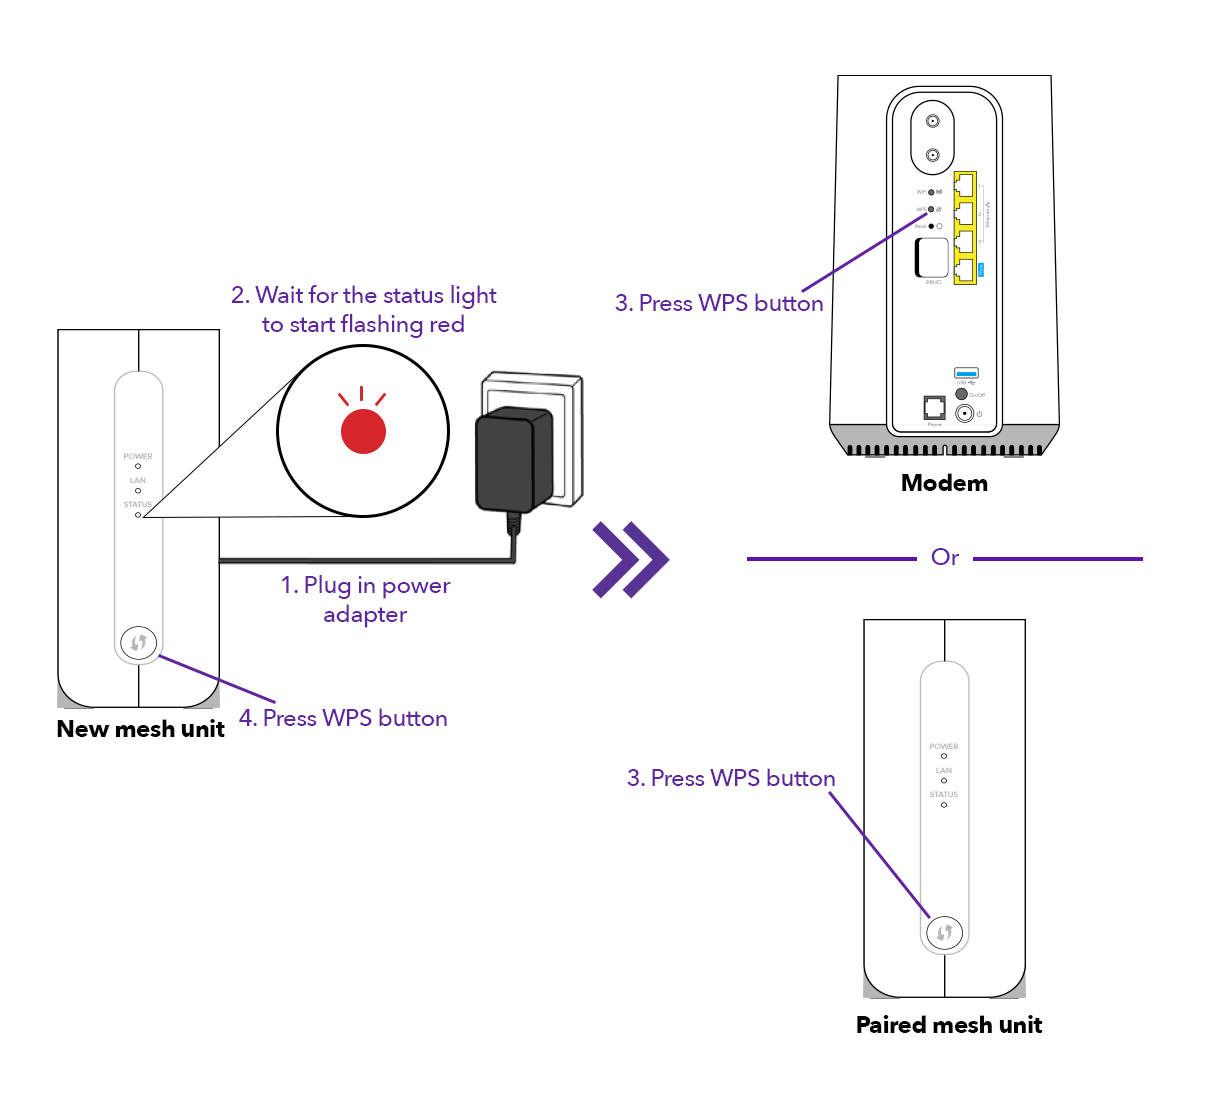
Pair using WiFi Protected Setup (WPS)
Before you start, you'll need to enable WPS in your modem settings. You'll find instructions for how to do that in our modem user guides. See modem device guides
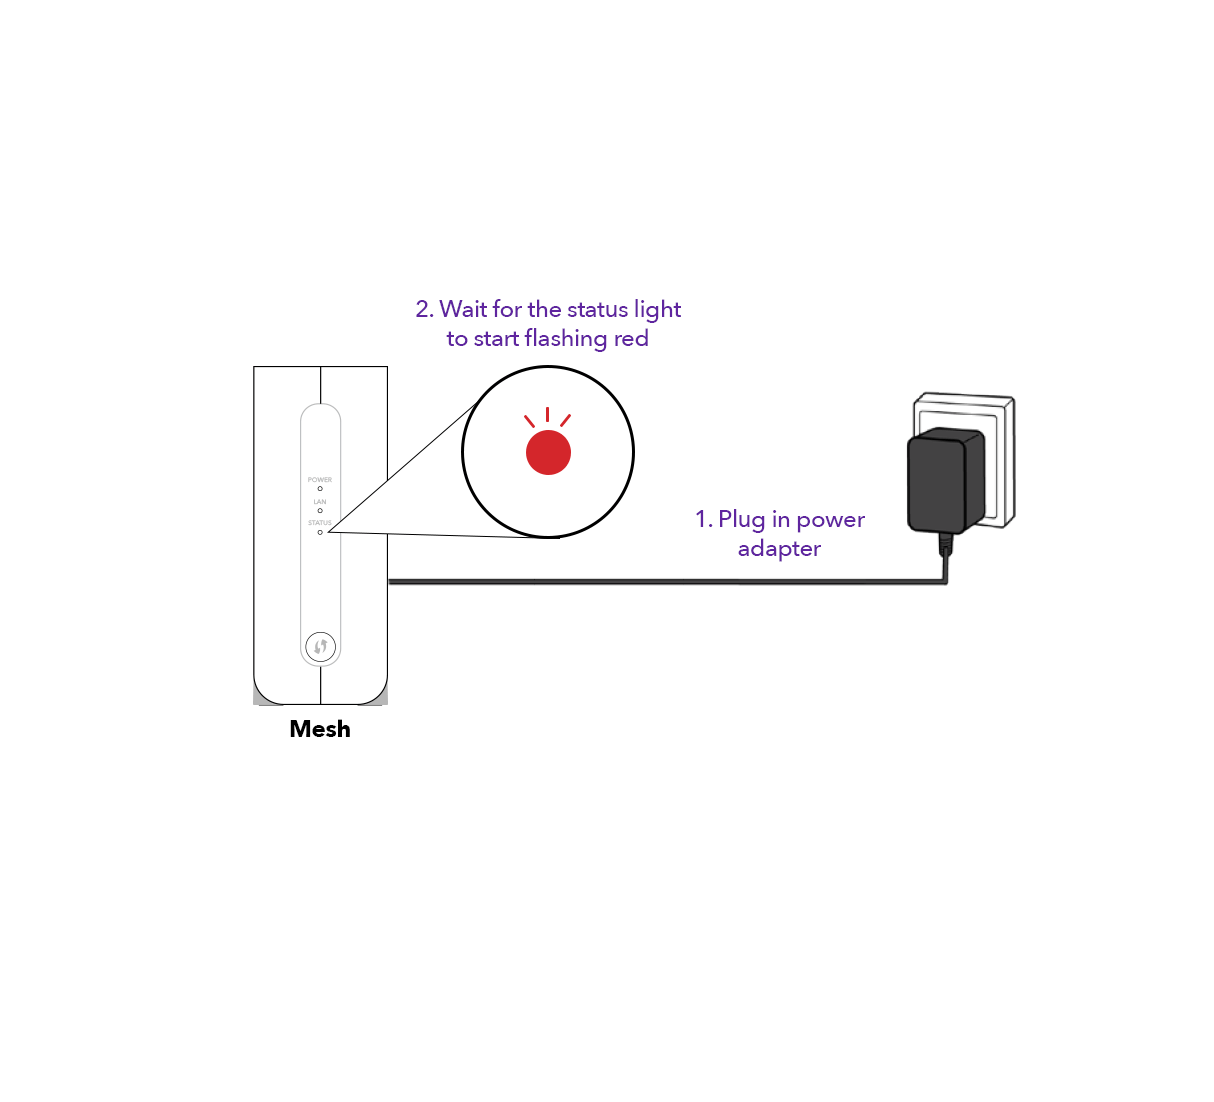
- Take your Smart Mesh 2 to the area you want to improve your WiFi coverage and plug it into a power socket there.
Some tips for where to place your Smart Mesh 2:
- It needs to be placed within the WiFi coverage of your modem.
- Keep it away from large metal objects.
- It works best when elevated rather than near the floor.
- Check it's not obstructed by objects in front of it.
- Wait for the status light on your Smart Mesh 2 to start flashing red.
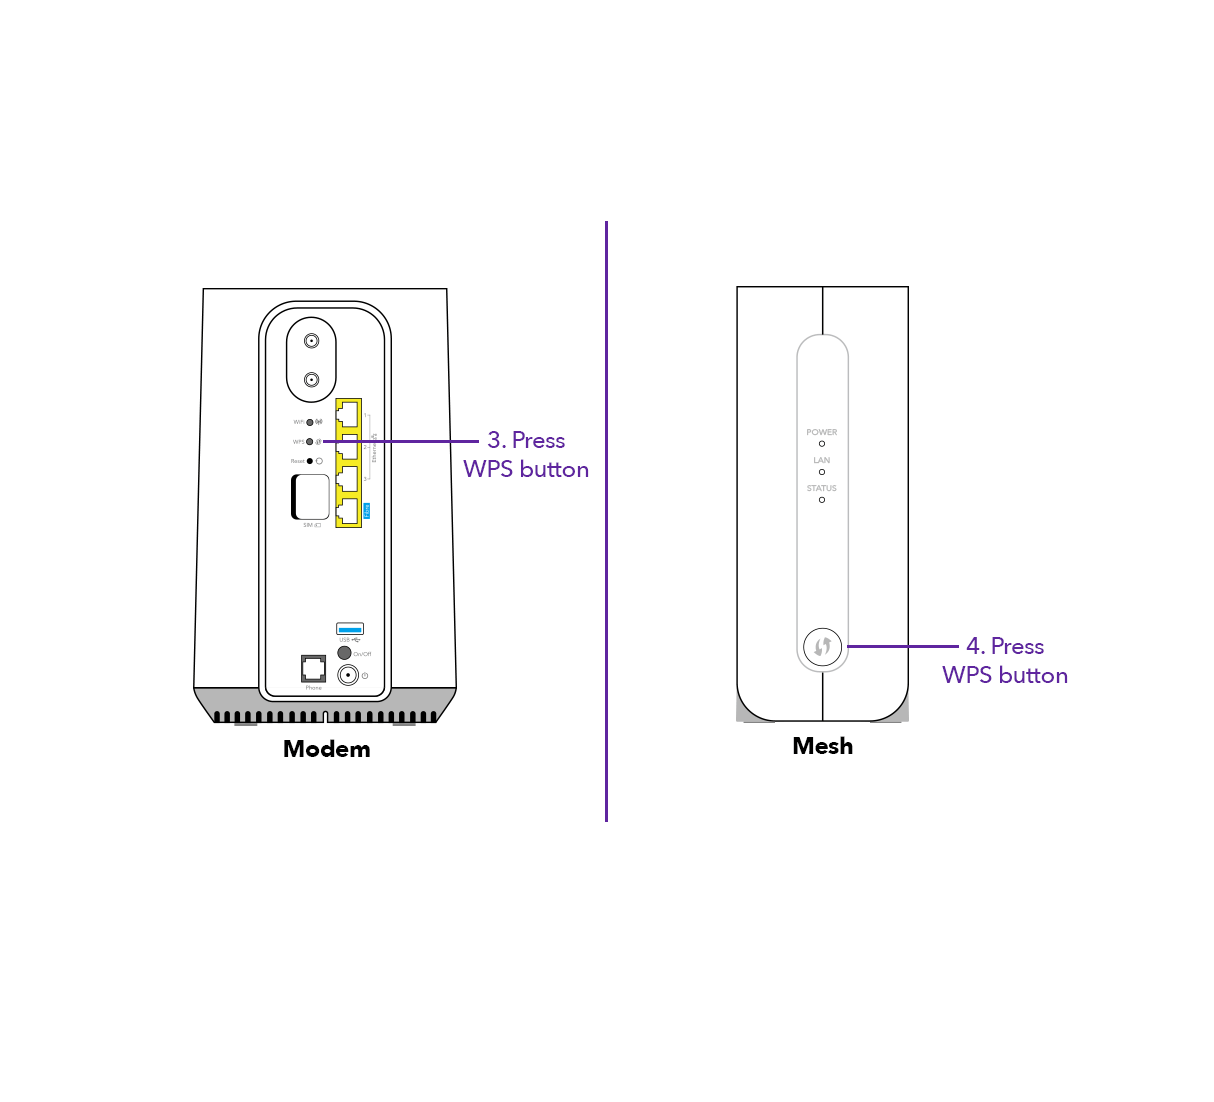
- Press the WPS button on your modem.
- Within one minute, press the WPS button on your Smart Mesh 2.
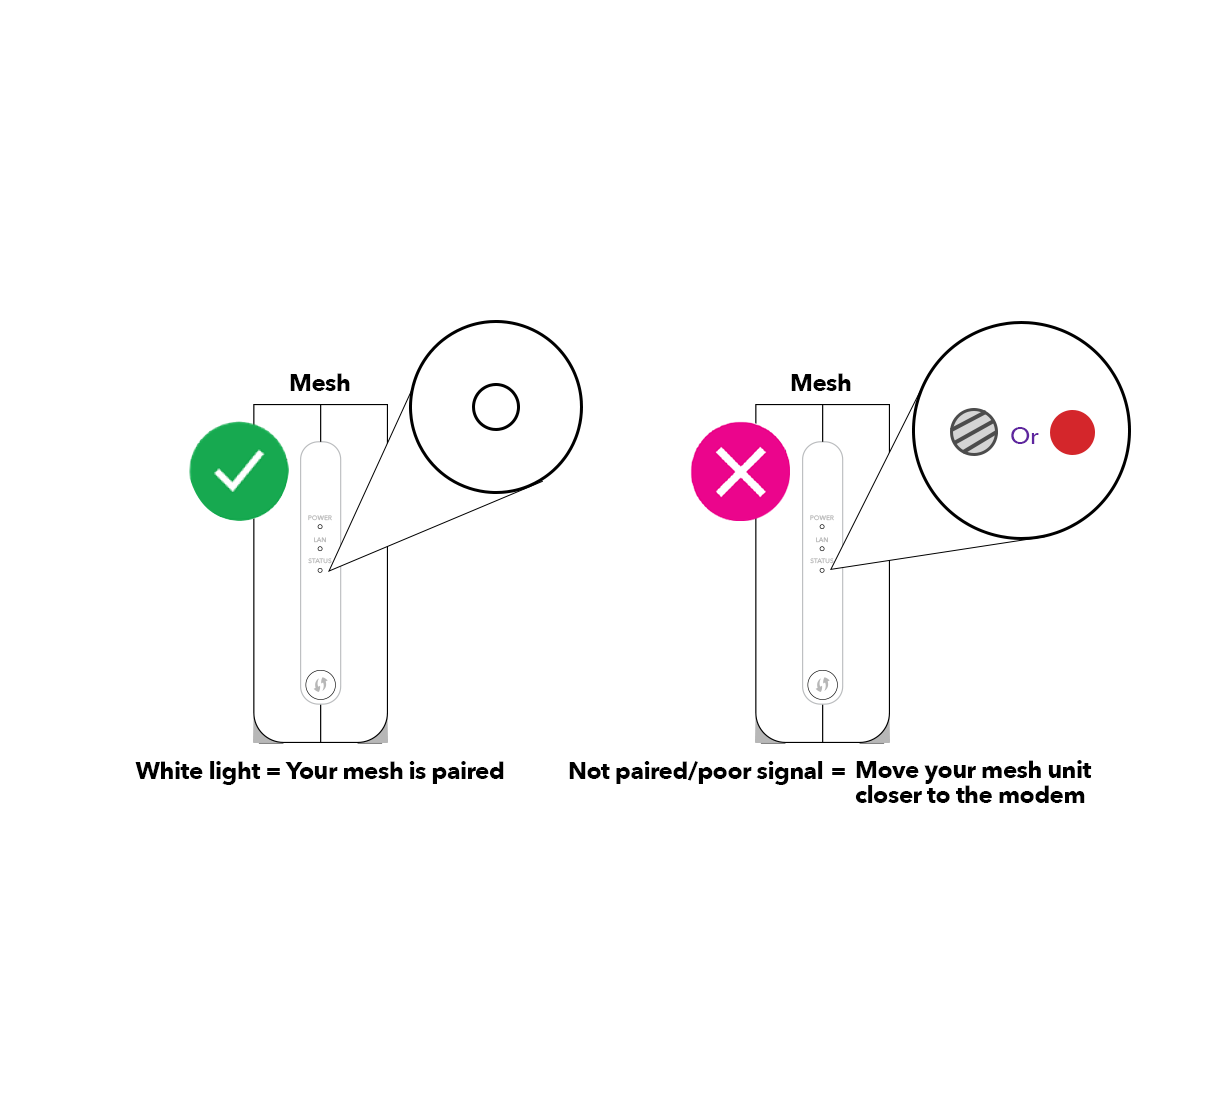
- Wait two minutes, then check the colour of the status light on your Smart Mesh 2. If it's:
- White: Your Smart Mesh 2 is receiving a reliable WiFi signal and you're all set up.
- Red: Your Smart Mesh 2 isn't getting a good signal. Move it closer to your modem or another Smart Mesh 2 if you've already set one up.
- No light: Your Smart Mesh 2 isn't receiving a WiFi signal at all. Move it closer to your modem or another Smart Mesh 2 if you've already set one up.
2. Connect your devices to WiFi.
Any devices you already had connected to your modem's WiFi will connect to the new mesh network automatically.
To add a new device:
- Turn on WiFi on your device.
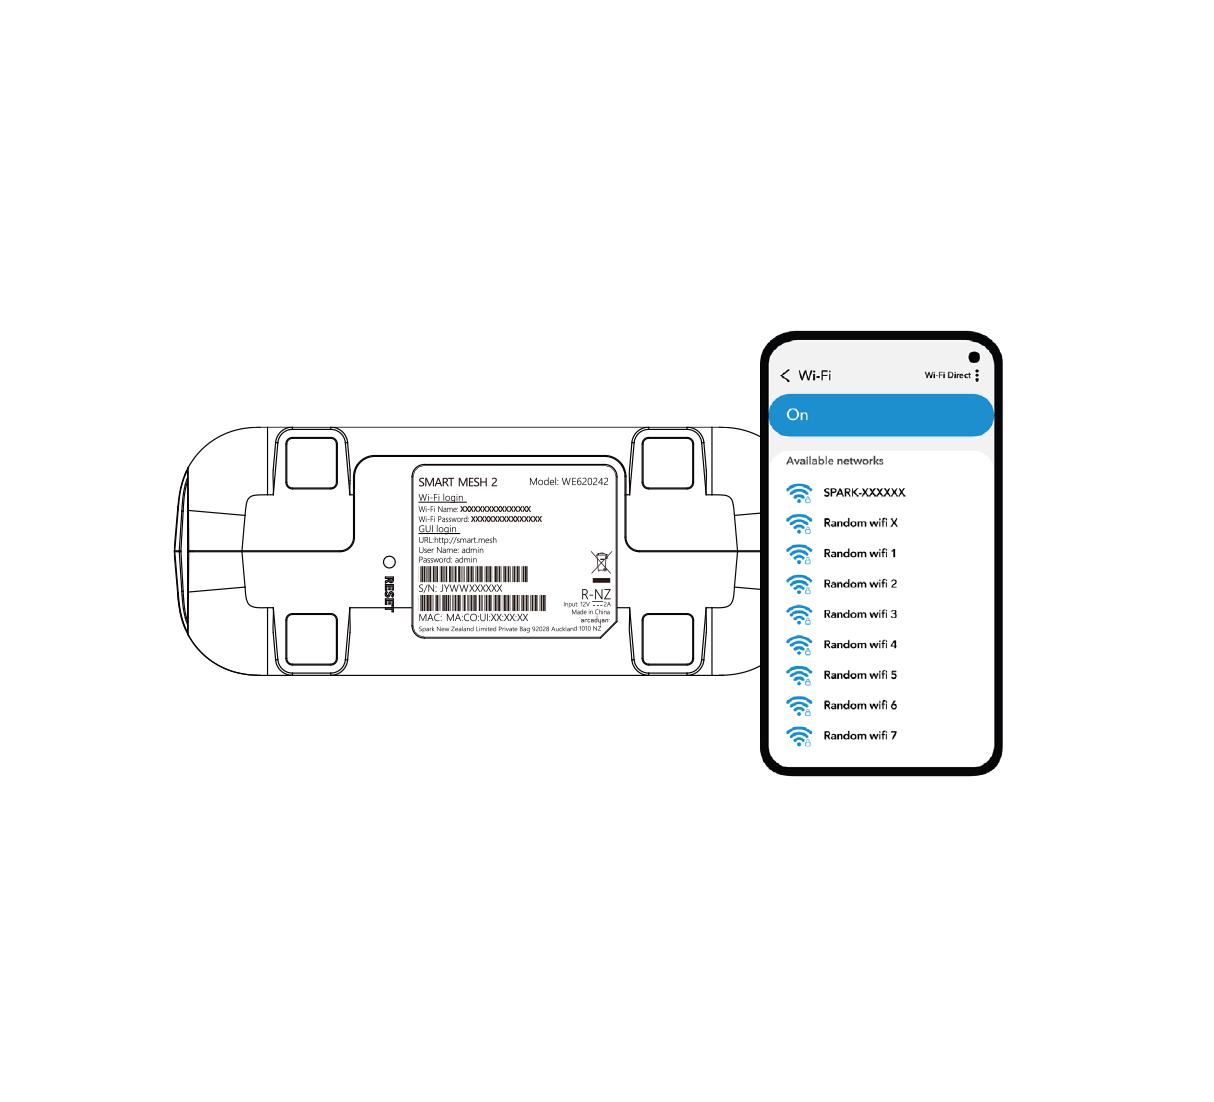
- Open your device's WiFi menu.
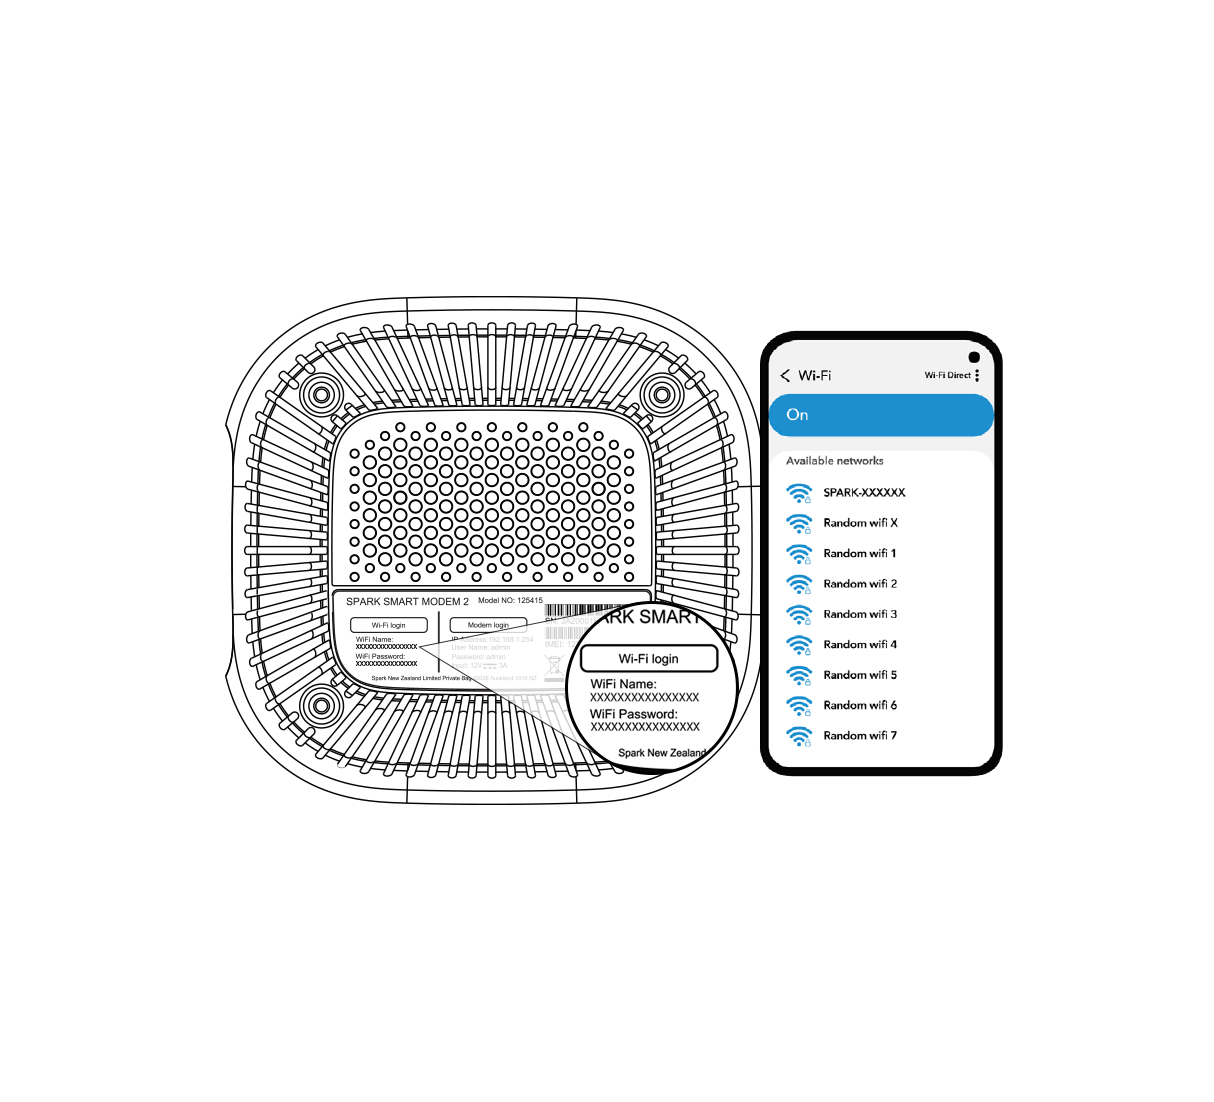
- Look for and select your WiFi network name.
- Enter the WiFi password to connect.
You'll find your default WiFi name and password on the bottom or back of your modem.
3. Add another Smart Mesh 2 to your network (optional).
You can have up to four Smart Mesh 2 units in your mesh WiFi network.
To add another Smart Mesh 2:
- Take your new Smart Mesh 2 to the area you want to improve your WiFi coverage and plug it into a power socket there.
Some tips for where to place your Smart Mesh 2:
- Keep it away from large metal objects.
- It works best when elevated rather than near the floor.
- Check it's not obstructed by objects in front of it.
- Wait for the status light on your Smart Mesh 2 to start flashing red.
- Go to your modem or the nearest Smart Mesh 2 that's already on your network. Press the WPS button on it.
- Press the WPS button on your new Smart Mesh 2.
- Wait two minutes, then check the colour of the status light on your new Smart Mesh 2. If it's:
- White: Your Smart Mesh 2 is receiving a reliable WiFi signal and you're all set up.
- Red: Your Smart Mesh 2 isn't getting a good signal. Move it closer to your modem or another Smart Mesh you've already set up.
- No light: Your Smart Mesh 2 isn't receiving a WiFi signal at all. Move it closer to your modem or another Smart Mesh 2 you've already set up.
1. Connect your first Smart Mesh 2 to your modem.
- Plug your Smart Mesh 2 into a power socket close to your modem.
- Plug one end of the included ethernet cable into an ethernet port on your modem. Plug the other end into your Smart Mesh 2.
- Wait for the status light on your Smart Mesh 2 to turn solid white. This may take up to two minutes.
2. Pair your second Smart Mesh 2.
- Take your second Smart Mesh 2 to the area you want to improve your WiFi coverage and plug it into a power socket there.
Some tips for where to place your Smart Mesh 2:
- Keep it away from large metal objects.
- It works best when elevated rather than near the floor.
- Check it's not obstructed by objects in front of it.
- Wait for the status light on your Smart Mesh 2 to start flashing red.
- Press the WPS button on the Smart Mesh 2 connected to your modem.
- Press the WPS button on your second Smart Mesh 2.

- Wait for the status light on your second Smart Mesh 2 to turn solid white. This may take up to two minutes.
- Check the colour of the status light on your second Smart Mesh 2. If it's:
- White: Your Smart Mesh 2 is receiving a reliable WiFi signal and you're all set up.
- Red: Your Smart Mesh 2 isn't getting a good signal. Move it closer to your modem or another Smart Mesh 2 if you've already set one up.
- No light: Your Smart Mesh 2 isn't receiving a WiFi signal at all. Move it closer to your modem or another Smart Mesh 2 if you've already set one up.
Repeat these steps for any extra Smart Mesh 2 units you want to add. You can have up to four Smart Mesh 2 units in your mesh WiFi network.
3. Disable your modem's WiFi (optional).
The WiFi on your modem can interfere with your new mesh WiFi network. We recommend you turn off the WiFi function on your modem.
If you got your modem from Spark:
- Log in to your modem. You'll find instructions for how to do this on our modem device help user guides. Go to modem device help
- Find the option for WiFi and turn it off.
If you have a modem that wasn't from Spark, refer to your modem's user guide for how to disable WiFi.
4. Connect your devices to your new mesh WiFi.
- Find the WiFi network name and password on the bottom of the Smart Mesh 2 connected to your modem.
- Turn on WiFi on your device.
- Open your device's WiFi menu.
- Look for and select your WiFi network name.
- Enter the WiFi password to connect.